
A Gentle Introduction to Mutation Testing with PITest and Kotlin
Who tests the tests? Let's see how code coverage doesn't tell the whole story and talk about the other half of the coin in automated checking
A Gentle Introduction to Mutation Testing

Note: This post’s content is part of my presentation on the Automation Guild 2020 talk named “Grow Your Automation Toolkit: Because when all you have is a hammer…”.
Our example
Let’s say you want to build a calculator application.

Amidst all UI and error handlingcode, sooner or later, you will write the heart of your application: The object that indeed does the calculations.
This object will know what is currently being displayed on the screen and will offer to the user mathematical operations over this value, such as sum, subtraction, etc.
Naively the class for this object could be implemeted as below:
class Calculator(var displayedValue: Double = 0.0) {

    // Operations over the displayed value

    fun add(x: Double) {
        displayedValue += x
    }

    fun subtract(x: Double) {
        displayedValue -= x
    }

    fun power(x: Double) {
        displayedValue = displayedValue.pow(x)
    }

    // Offers to the client the current value
    fun getResult() = displayedValue

    // This function serves to update the current value in the displayed itself.
    // The client can allow the change or not.
    // The examplification purpose of this function will be clear in the rest of the post.
    fun tryToSetDisplay(x: Double, canChangeDisplay: Boolean): Boolean {
        return if (canChangeDisplay) {
            setDisplay(x)
            true
        } else {
            false
        }
    }

    private fun setDisplay(x: Double) {
        displayedValue = x
    }
}
And the objects created by this class could be validated by the checks below:
class CalculatorTest {
    @Test
    fun testAddition() {
        val calculator = Calculator()
        calculator.add(2.0)
        assertThat(calculator.getResult()).isEqualTo(2.0)
    }

    @Test
    fun testPower() {
        val calculator = Calculator(displayedValue = 2.0)
        calculator.power(3.0)
        assertThat(calculator.getResult()).isEqualTo(8.0)
    }

    @Test
    fun testConditionalSetTrue() {
        val calculator = Calculator()
        assertThat(calculator.tryToSetDisplay(2.0, true)).isTrue()
    }

    @Test
    fun testConditionalSetFalse() {
        val calculator = Calculator()
        assertThat(calculator.tryToSetDisplay(2.0, false)).isFalse()
    }
}
Is Code Coverage enough?
What is the code coverage of the checks above, in relation to its target class?

The missing method and line coverage is due the fact we are not exercising the subtract method in our suite of checks.
This can be solved by adding a check for it:
@Test
fun testSubtraction() {
  val calculator = Calculator(5.0)
  calculator.subtract(2.0)
  assertThat(calculator.getResult()).isEqualTo(3.0)
}
Now we have 100% code coverage!


Goal of unit testing
Before answering the question on title this section, let’s reflect on the goals of developer checks (unit testing).
The first goal of creating unit checks is to enable the development of production code itself.
By defining a failing check, the developer has an executable feedback about the next production code change he / she should do.
The second goal is regression validation. The unit checks allow the developer to know if the aforementioned changes end up breaking other behaviors already implemented on the application.
Another way of saying it is: When a behavior change, a unit check should fail. If we change a behavior in the product code and all checks pass, it means the changed behavior of the application was not covered properly by the unit check suite.
Where Code Coverage fails
To avoid having uncovered areas of the application, a common approach is, as we did, is to measure the Code Coverage (it asks ‘have the execution of the checks exercised this piece of code in a particular way?’).
Above, Code Coverage metrics indicated to us that we were missing a check.
That’s great and highly valuable!
However, let’s see what happens if we do the following behavior change:
fun tryToSetDisplay(x: Double, canChangeDisplay: Boolean): Boolean {
return if (canChangeDisplay) {
    // Now the display is never changed
    // setDisplay(x)
    true
  } else {
    false
  }
}
Re-executing our checks and measuring their coverage gives us: All passing and 100% coverage.
This problem happens because “traditional” code coverage aims at answering “is the production code well-covered by the suite of checks?”. The problem above is an example of the question “does the suite of checks cover well changes in the production code?”.
This subtle difference is crucial, because the first question is concerned with the current state of the production code, whereas the second question talks about possible future states of the production code.
In the rest of this post we will investigate how to answer the second question.
What is Mutation Testing?
Mutation Testing is an abstract testing technique that investigates how systems would behave when something change.
It can be instantiated is many ways. E.g., A/B testing focus on investigating how users would react when certain feature changes somehow.
However, Mutation Testing is, most of time, referenced as a supplement to code coverage. This interpretation is our concern in this post.
Mutation Testing here is the process of spotting “holes” in the unit check suite, which allow behavior changes in the production code go unchecked.
Generally the Mutation Testing process is as follows:
Input: The Original Program (OP) + A set of heuristical mutation operators (HMO)
1 - For each HMO, apply it to the OP - resulting in a set of Mutated Programs (MP);
2 - For each MP, run all Tests;
3 - Classify each MP as:
3.1 - “Surviving mutant” if all tests pass in (2).
3.2 - “Killed mutant” if at least one test failed in (2).

Let’s explain the terms:
OP and Test are self-explanatory.
A Heuristical Mutation Operator is a standard way of changing behavior of code. As examples of HMO are changing boolean operators (replace >= for <), invert negatives (replace return i for return -i), or remove void method calls, as we did above.
The heuristic characteristc of the HMO resides in the fact that they don’t rely on the context of a code statment. It doesn’t know if the change will actually cause changes in the externally visible behavior.
For instance, if we change how a unused boolean variable is calculated, we will not change the external results of a function. Also, in the expression A OR B, if A is always true for our use cases, changing how B is calculated will not cause external visible changes. The advantange of the heuristics is that they usually cause valuable changes in the externally visible behavior, and they can be performed by a computer, because of their repetitive nature.
The existence of Surviving Mutants expose which pieces of code demand changes in the suite of checks so that the “real” changes will not go unchecked in the future.
Additionally, we can generate a new metric:
Mutation Coverage: number of killed mutants / number of mutants in total
PITest - Mutation Testing for the JVM
If you are in the JVM world, the most widely used Mutation Testing tool is PITest.
Due to its easy of use and out-of-box features that allow rapid integration of this technique in an automated manner in JVM projects, we will discussed it here. Additionally, PITest is also very mature in terms of optimizing the mutation testing process, for it finds redudant mutants, parallelize the verification process, uses previous executions of itself to infer results without processing, etc.
Installation
If you use Maven for managing your dependencies, to use PITest, you have to add it as a pluging in your pom.xml:
<plugin>
    <groupId>org.pitest</groupId>
    <artifactId>pitest-maven</artifactId>
    <version>${pitest.version}</version> <!-- Currently 1.5.1 -->
</plugin>
Note: PITest is also available for Ant and Gradle users.
Execution
With the pluging in place, you will first need to run your tests as usual and afterwards invoke the Maven task to extract the mutation coverage.
In the simplest case:
mvn test org.pitest:pitest-maven:mutationCoverageReports
It results in two reports.
Terminal
On the terminal, PITest outputs the results for each operator.
For example, below is the output for the MathMutator, where we can see how many Mutanted Programs were generated by the application of this operator and the results of running all unit checks we had.
================================================================================
- Mutators
================================================================================
> org.pitest.mutationtest.engine.gregor.mutators.MathMutator
>> Generated 2 Killed 2 (100%)
> KILLED 2 SURVIVED 0 TIMED_OUT 0 NON_VIABLE 0
> MEMORY_ERROR 0 NOT_STARTED 0 STARTED 0 RUN_ERROR 0
> NO_COVERAGE 0
These two mutants were related to the add and subtract methods. In the first case, the + sign was replaced by an -; in the second case, the - sign was replaced by an +. (More clear view of each mutant can be see on the HTML report)
In the end of the terminal report, you can see a summary of the all mutants and their status.
================================================================================
- Statistics
================================================================================
>> Generated 7 mutations Killed 5 (71%)
>> Ran 7 tests (1 tests per mutation)
HTML
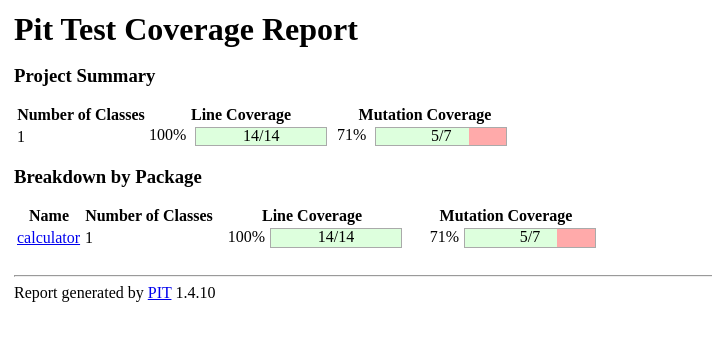
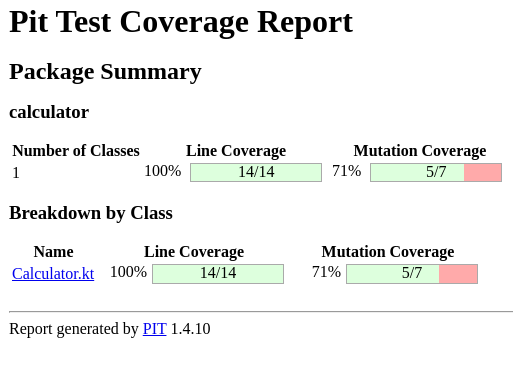
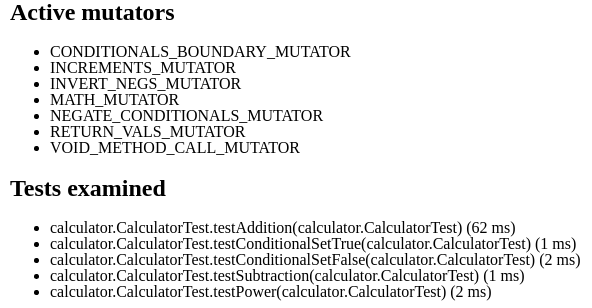
PITest also generates out-of-the-box HTML reports.
After calculating the mutation coverage, you can navigate through each package and class, examing the “traditional” code coverage (lines) and the mutation coverage of each entity.
And for each class you can see the details of each line and how the operators acted on them.
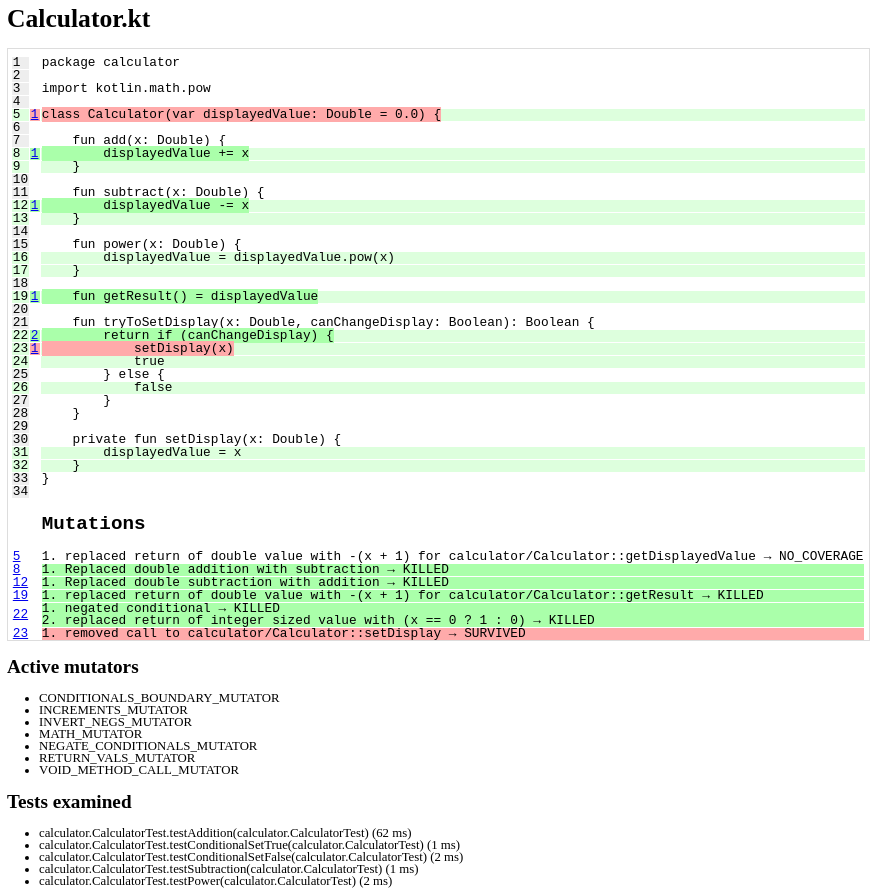
Also a list of Mutation Operators and which checks were involved in this class particurally.
The examination above already integrated the check for subtraction function that we added. If we exam the code without this check, we would see that PITest doesn’t even try to mutate this line, because it already knows that no check will fail.
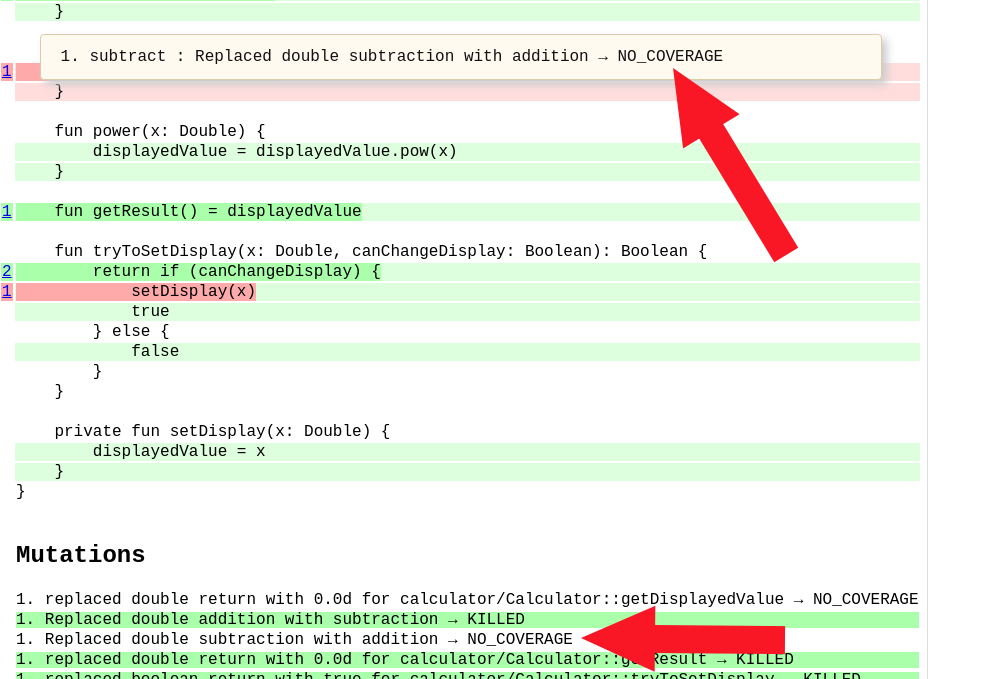
It’s a important optmization for run-time, but also means that PITest can be integrated well in projects that don’t have good code coverage.
You can download the code here.
Research on Mutation Testing
Mutation Testing is still an area of great development. Every year new frameworks and approaches are created. Papadakis and others have assembled a great summary of recents advances in the area, check it out here.
People are creating libraries based on Recurrent Neural Networks, researching application in particular stacks, such as Android and the Google Query Language, etc.
If you want to stay up-to-date with news in the area, I would suggest creating a Google Scholar alert with Mutation Testing as keywords.
Conclusion
We saw how Code Coverage, although is important, is not sufficient for giving good feedback of the changes developers implement.
Mutation Testing tackle this problem in a systematic way, by applying changes heuristically and validating the suite of checks reaction to them.
With PITest, Mutation Testing becomes a powerful tool for better quality in monitoring of our suite of automated checks. With a few lines, we can plug it to our projects and get fast feedback.
Nonetheless, Mutation Testing is a broad field, with many tools and approaches. It’s our job to understand our context and look for the best approach to support thoroughly development.
Seems interesting? :)
Tell me what you think of Mutation Testing.
Comments
Comments are powered by Giscus and use GitHub Discussions. Sign in with GitHub to leave a comment.