
Subscribe to our RSS here.
About Postman and the Trello API
Postman is a lightweight tool the interact with Web Services. By abstracting low-level commands, such as cURL, and by structuring request formation, Postman allows us to create complex requests and explore APIs with ease.
Trello is a project management web application - it exposes endpoints for a manifold of operations on its entities.
What we are going to do and learn
Our goal will be to perform the classical database operations on Trello entities: Create, Retrieve, Update, and Delete.
This is what we are going to do:
Step 1 - Create a Trello board, wherein other entities will leave;
Step 2 - Create two basic lists for project management: TODO and DONE;
Step 3 - Create a card (a task) in the TODO list;
Step 4 - Move this card from the TODO list to the DONE list;
Step 5 - Since we are done with all tasks, we will delete our board.
By performing these 5 steps, we will learn how to use the main features of Postman:
- How to create requests of different HTTP methods;
- How to use variables to coordinate work between requests;
- How to check the responses given by an API, to ensure it behaves as we expect.
Can’t we test it using Selenium?
It’s true that we can do it using Trello’s frontend interfaces, either desktop or mobile - and Selenium scripts could drive our tests and verify the behavior.
However, there are two main reasons why these steps should be verified mainly on the API level:
1 - Precision: As mentioned, Trello has many frontend interfaces: mobile applications, desktop (which may vary in behavior in different browsers), etc. If we want to verify backend behavior through some of these interfaces, we will be fragile to errors in the interfaces: If a button is not rendered due a frontend bug, our test will fail, although the backend may be working as expected. Every failure would require debugging in a wider code area.
2 - Performance: Imagine that you want to remove petrol from under the ocean. You would need to pass through the water, the underwater sand and come back. An end-to-end (frontend + network + backend) test requires more processing than an API test (network + backend). If we can complete the API tests with pure frontend tests (network isolated) and contract tests, we can have the same level of confidence of the end-to-end test, but faster.
Starting: Fetching the list of boards
Sending a GET request
Let’s first see if we can fetch some public data.
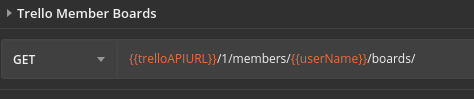
The Trello API has an endpoint that allows us to fetch data of all public boards of an user (on the API referenced as a “member”). The cURL call to this endpoint has the following format:
curl --request GET --url https://api.trello.com/1/members/id/boards
The cURL call tells us two things:
1 - We need to send a GET request;
2 - The endpoint URL starts with the https://api.trello.com address, on the version 1, on the resource members. We will need to pass the user ID or username. Inside the resource which represents the account, the boards resource gives us the information about my public boards.
On Postman, this cURL call can be written like this:
On the left side, we configure the type of request we want to send: GET.
On the right side, we place the URL.
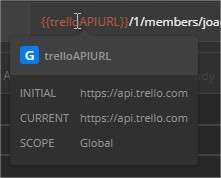
The values between curly brackets are variables.
Variables allow is to reuse data between requests. Variables can have 5 scopes:
1 - Global
2 - Collection
3 - Environment
4 - Data
5 - Local
For our purposes, using either Global, Collection, and Environment would work - but be aware that some situations require more thinking on the variable scope (specially when dealing with parallelism).
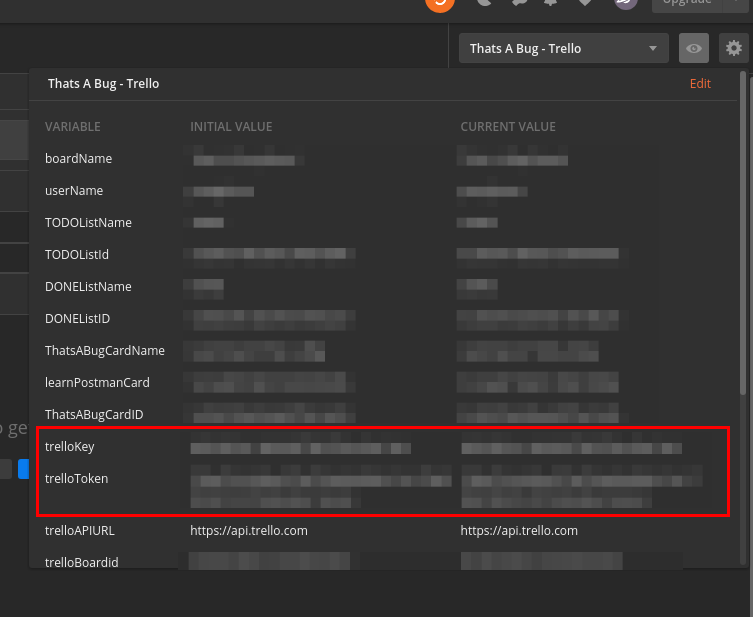
You can see all your current variables on the eye menu, on the top right corner of Postman.
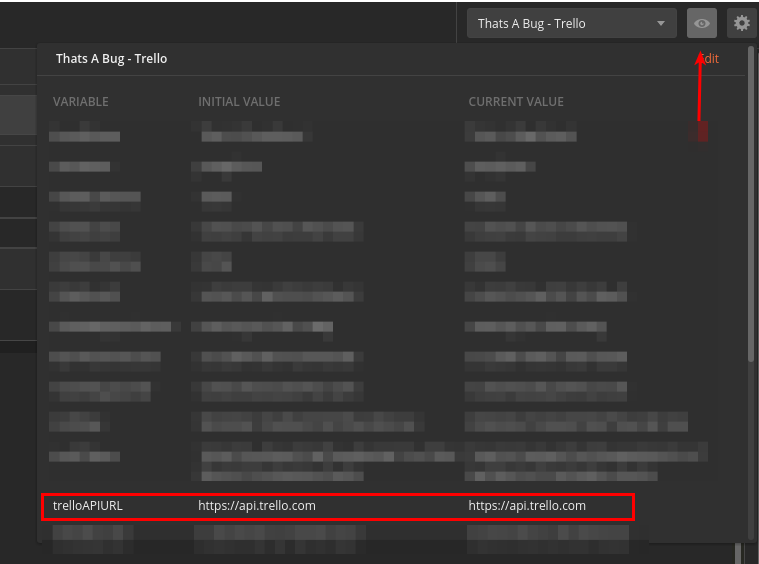
Since we will work only with the Trello API, it makes sense to have its URL saved in a single place and reference it in every request.
As you can see, the curly brackets syntax works on the same, fetching the global variable data at run time.
When we send this request, Postman will display the JSON response on the bottom of the app.
Try to access your short link, to see one of your boards:

Getting access to Trello API
However, to create and modify entities using the Trello API, we need to identify ourselves in the HTTP requests.
As a step 0, we need to be sure that we can interact with the Trello API.
The documentation for the Trello API tell us we will need two pieces of information to confirm to Trello our identity: Our API Key and an OAuth token, both associated uniquely to our Trello account.
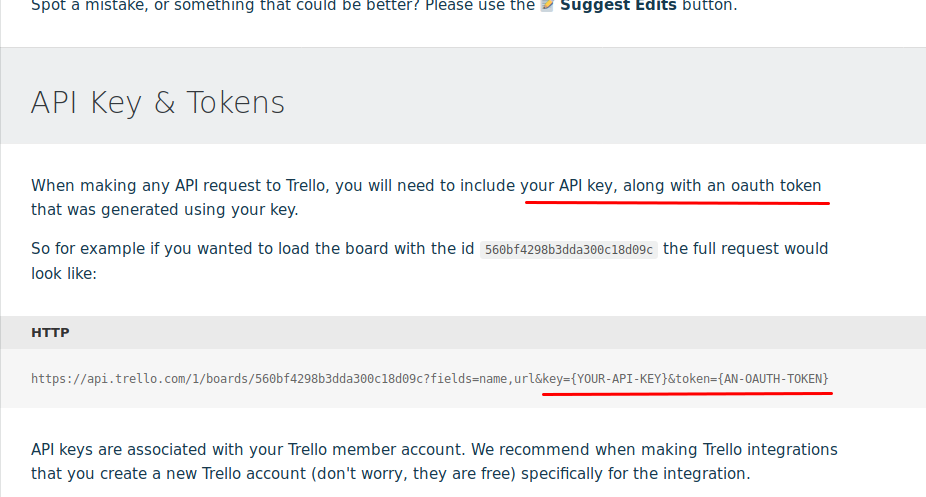
If you are logged on Trello on your web browser, you can retrieve these information by access the following URL: https://trello.com/app-key
On the top of the page, you will see your API Key:
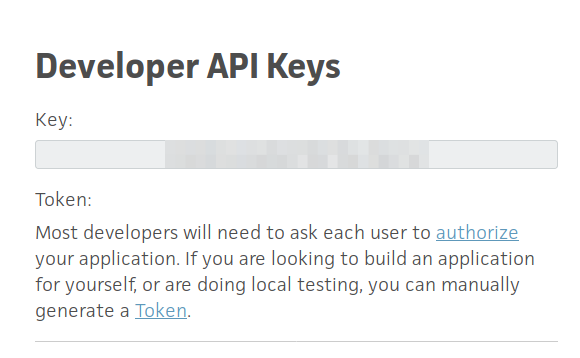
And on the bottom of the page, you will see your OAuth token:
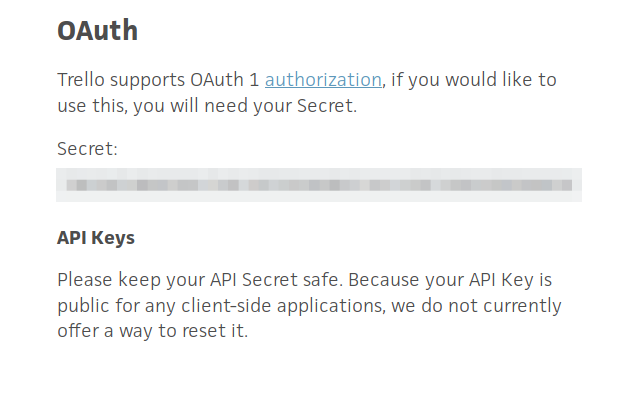
Now, we just need to save these two values on Environment Variables:
Step 1: Create a board
Ok, we can access the Trello API using our keys and fetch data from it.
The next step is to perform some actions. Let’s start with the first action of the CRUD: A new board shall be created!
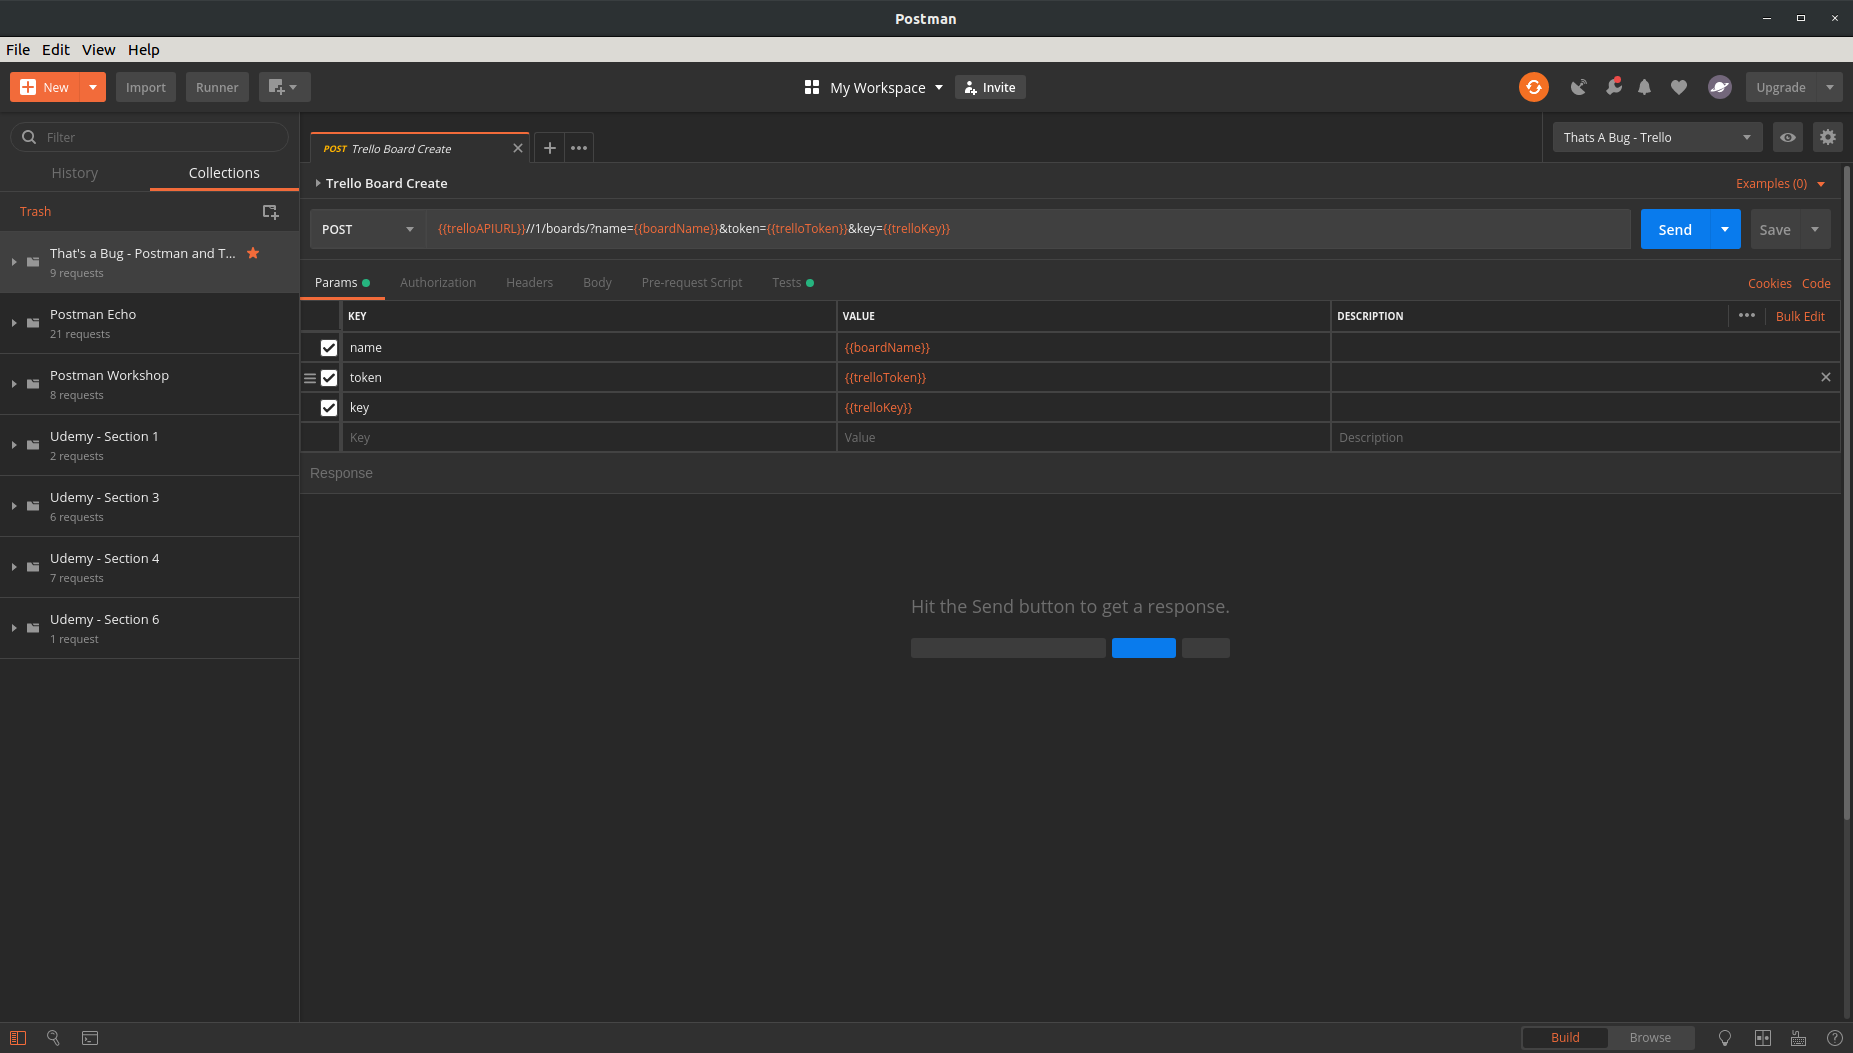
The Trello API exposes an endpoint for creating new boards. The cURL call would be of the following format:
curl --request POST --url https://api.trello.com/1/boards/?name=name
It says we should make a POST request to the boards endpoint, passing the name of the board we want to create.
This is exactly the same information we have to pass when creating a board using Trello’s frontend.

On Postman, this would be our request:
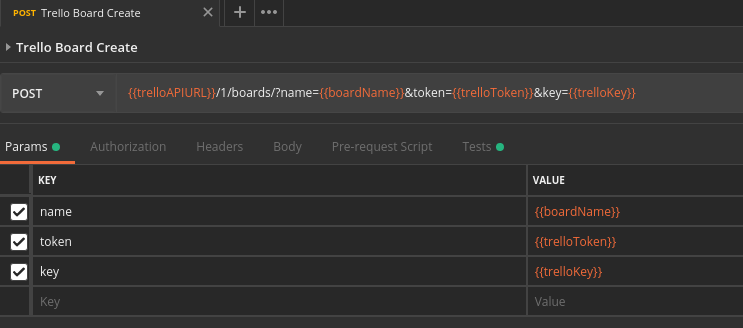
Now, instead of GET request, we will send a POST request. The Trello’s address, token, and key came from the environment variables, as before. Now, however, we have the additional parameter name.
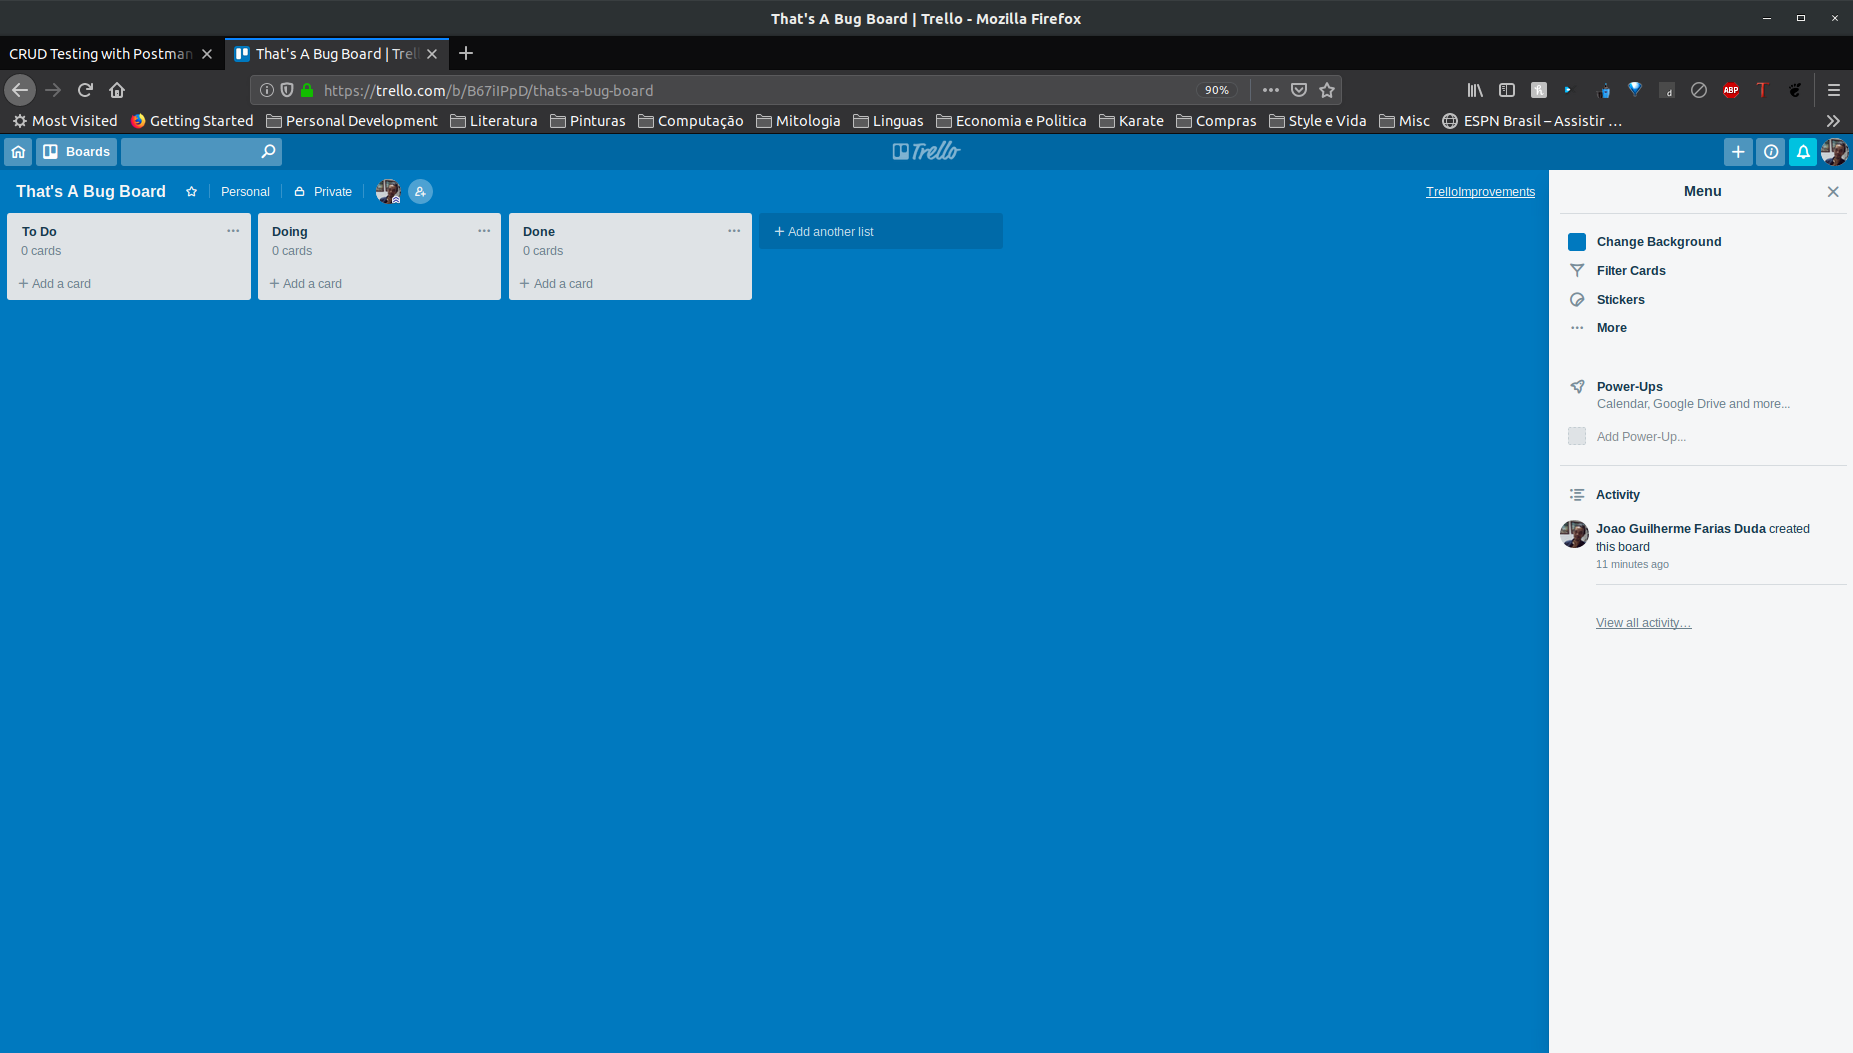
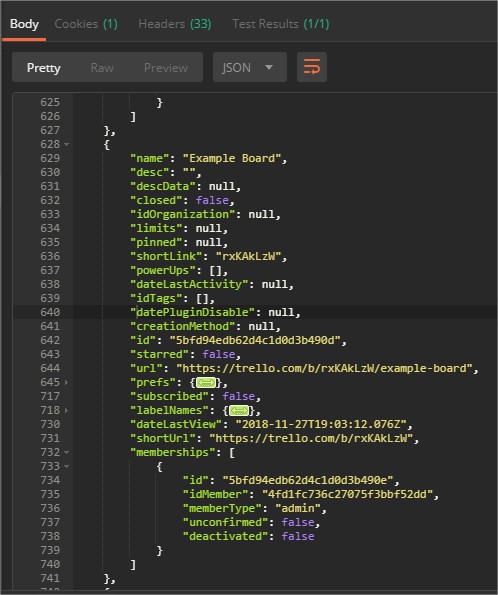
When we send this request, Trello creates the board on its backend and provides to us the data about the newly created board.
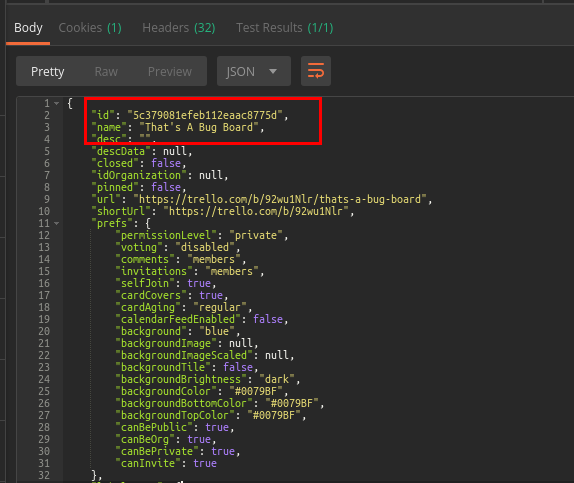
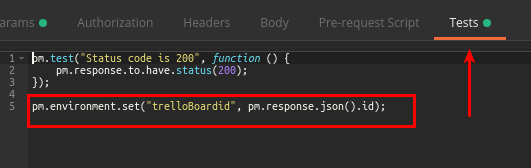
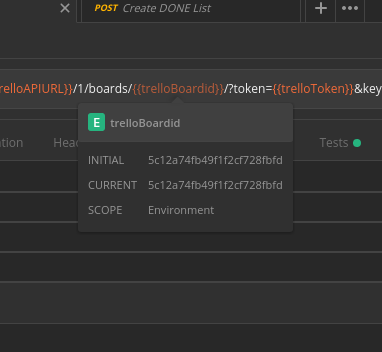
The most important information, for our purposes, is the new board ID. It will allow us to reference specifically this board on future requests. To do it, we need to save this information in a variable.
Since we want to use information provided by the response, we must use the Test tab. In this tab, the object pm.response provides all information of the request’s response. Since we know that we are dealing with a JSON API, we can interpret the response as a JSON object and, thus, extract the id attribute as we would do in any JavaScript program.
pm.response.json().id;
The pm.environment.set function allows us to update or create an environment variable. Therefore,
it’s straightforward to save our board ID to be used in the following requests.
Step 2: Create two lists
Our board is created and we have a reference to it. It’s time to create some lists…
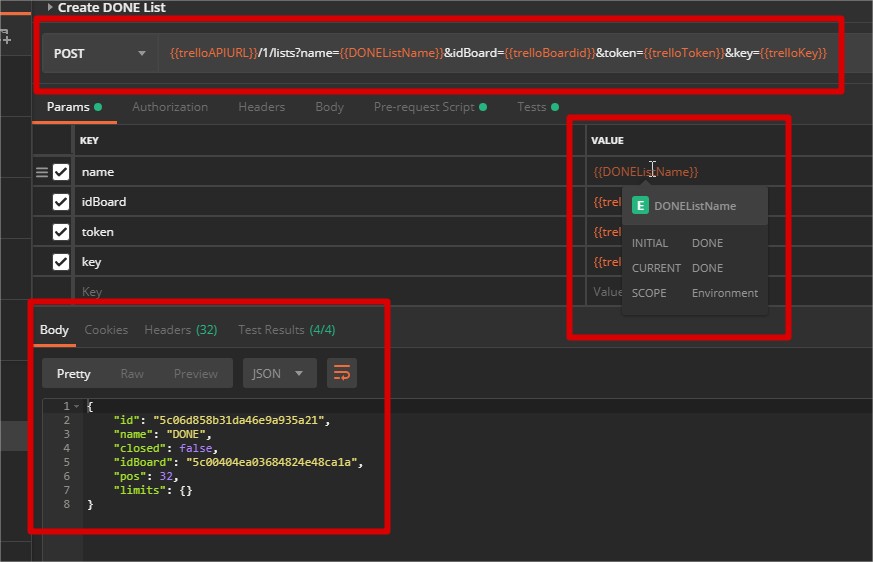
The endpoint to create lists is accessed by the following cURL command:
curl --request POST --url 'https://api.trello.com/1/lists?name=name&idBoard=idBoard'
As expected, since we are dealing with creating a new entity, we have to send a POST request. The endpoint address is the same as before. The endpoint for creating with lists is lists.
The creation requires the attributes name and idBoard (besides our access tokens). So, we can reuse the tokens variables, fetch the board ID value we’ve saved, and pick the name we want.
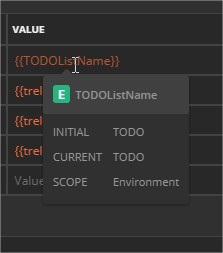
The TODO List
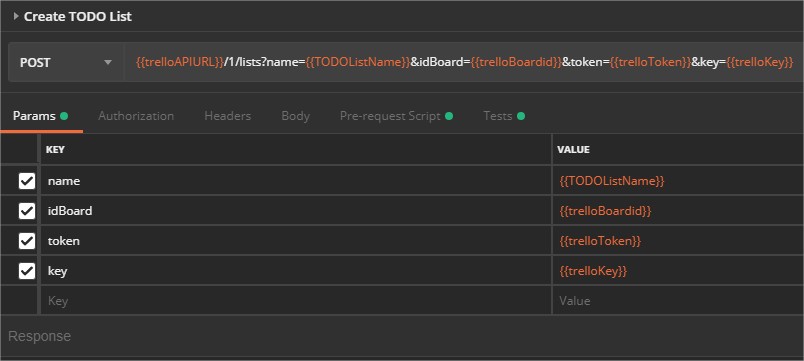
The name can come from a variable if we want to do some sort of checking of the response.
The response for list creation is simpler than before:
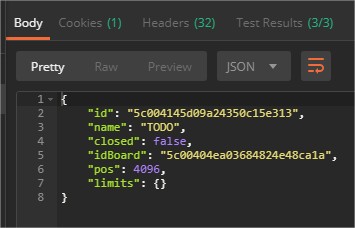
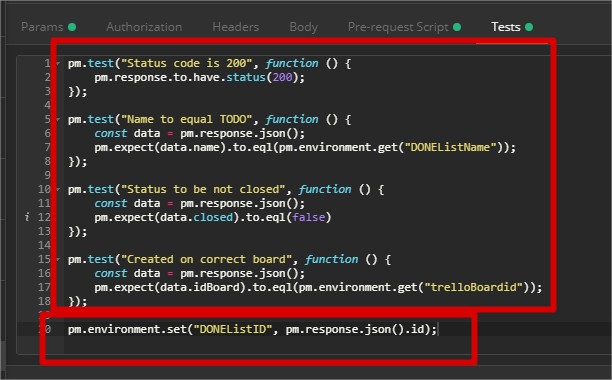
And we can perform some checks on the response:
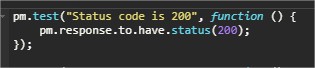
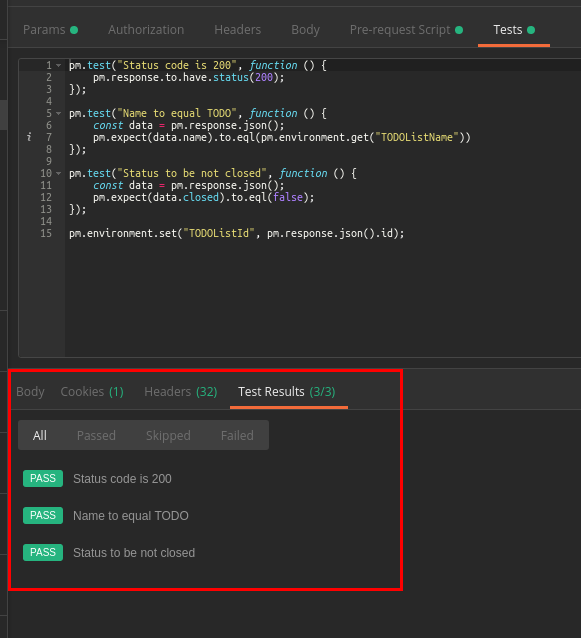
1 - The response is OK (code 200):
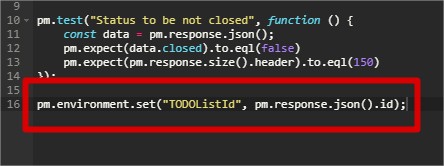
2 - The list name is the same we have sent on the request:

3 - The list is created not closed:

Postman’s interface also provide non-functional information, such as response time and size.

pm.response.responseTime, pm.response.size().body and pm.response.size().header provide this information.
Try to create checks for it!
Since we will refer to this list in the future, we should save its ID in an environment variable:
Postman will automatically run the Javascript code on the Test tab after the request, displaying the result on the Test Results tab:
The DONE List
The DONE list will follow the same pattern as the TODO List: All checks and procedures of the previous section can be duplicated.
We create it on the same endpoint, using a defined variable - getting as response the data of the list.
We therefore validate this data and save the list’s ID on an environment variable_.
Step 3: Creating a card
With our lists created, we can populate them with cards.
The endpoint to create cards is accessed by the following cURL command:
curl --request POST --url https://api.trello.com/1/cards?idList=idList
Again, in order to create a new entity, we will send a POST request. The endpoint address is the same as before. The endpoint for creating with cards is cards.
The creation requires only the idList attribute (besides the access tokens).
See how only this attribute is highlighted with a red asterisk.
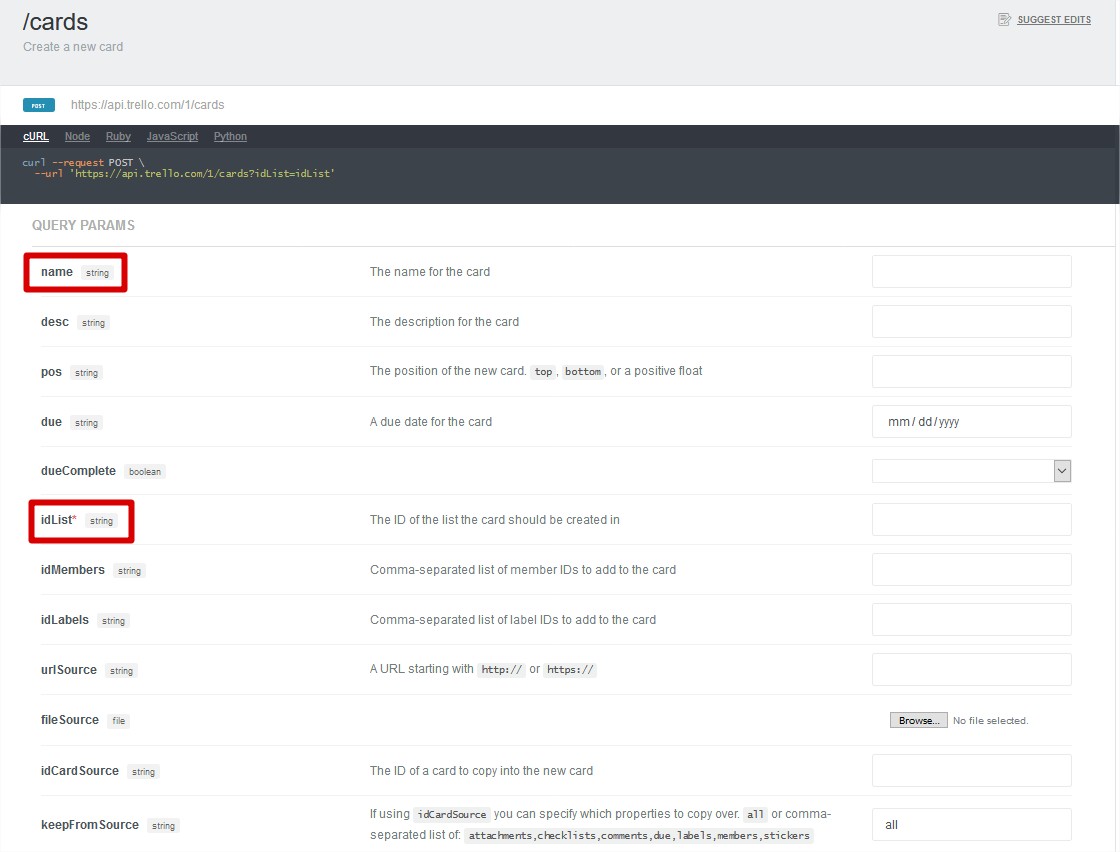
Attributes without an asterisk are optional. In this post, we will use the name attribute, just to give more realism to the created cards.
On Postman, the URL for creating card would the following:

Again, using the concept of variables for access tokens, list ID (saved automatically after the checks), and the card’s name.
The card’s information that comes with the response is very comprehensive:
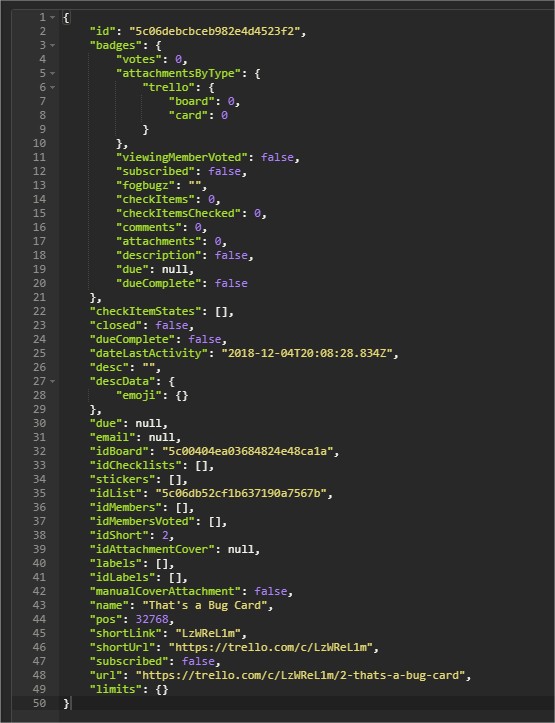
Some checks can be performed on these response:
1 - The response status

2 - The card name

Observe how we used the function pm.environment.get to fetch the current value of an environment variable, instead of using hardcoded test data. It means that regardless of the card name itself, the check will use the same value used on the request creation.
We can use this for other checks that deal with variable-defined values:
3 - If the card was created on the correct list

4 - If the card was created on the correct board

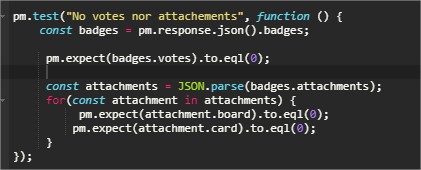
5 - If the card’s default status is “no votes nor attachments”
The last check validates the badges object of the response, using basic Javascript to parse and loop through this object.
Step 5: Moving the card between lists
Now that a card is created the TODO list, we will move this card to the DONE list.
The endpoint to update cards is accessed by the following cURL command:
curl --request PUT --url https://api.trello.com/1/cards/id
Now, instead of a POST request to a specific list, we will send a PUT request for a specific card.
In a REST API, the PUT request creates or updates an entity, similarly to the POST request. However, PUT request are idempotent - meaning that performing the same request repeatedly has the same effect as one call.
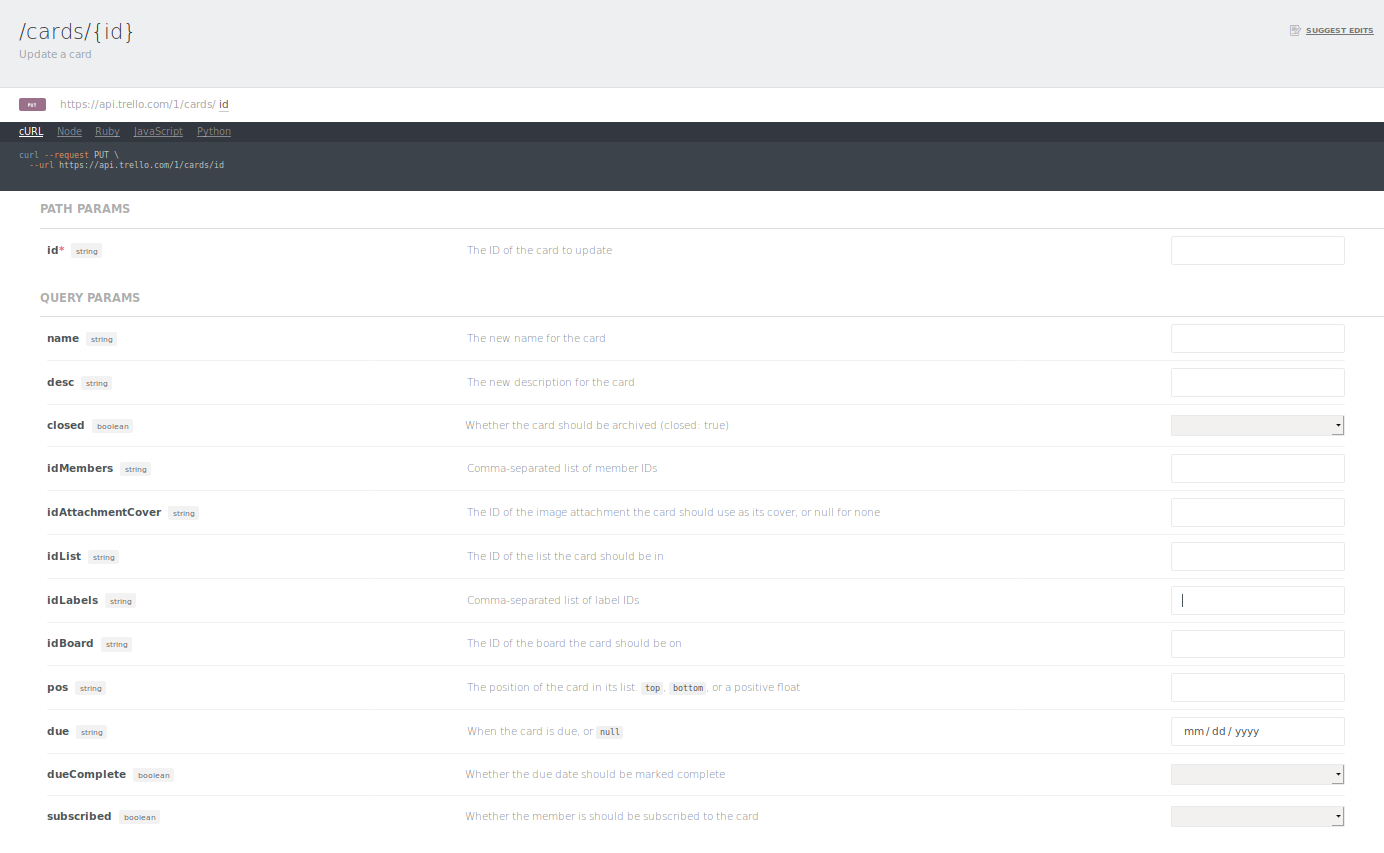
The call to the cards/id endpoint allow us to update almost all attributes that we could have set on the card creation.
On Postman, the URL for update the card would the following:
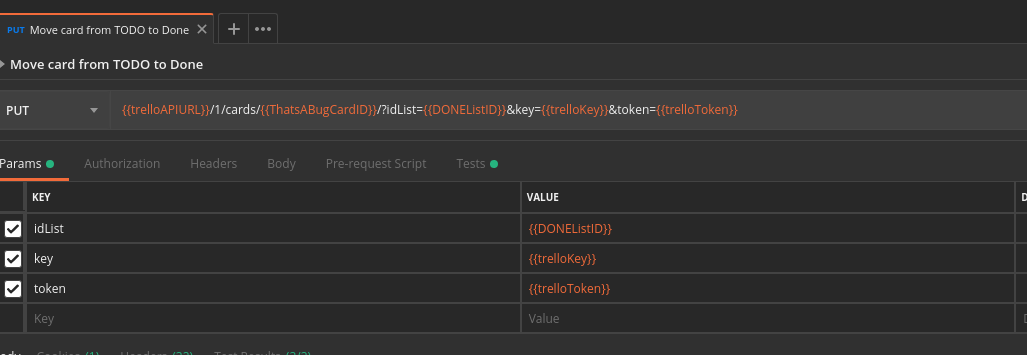
We are using the card’s ID that we’ve saved on the last request to reference it on the URL formation. Since the only attribute we want to update is the idList, we are passing only this attribute. Additionally, as usual, we pass also our access credentials.
The response comes with all information about the card, with the updated list ID:
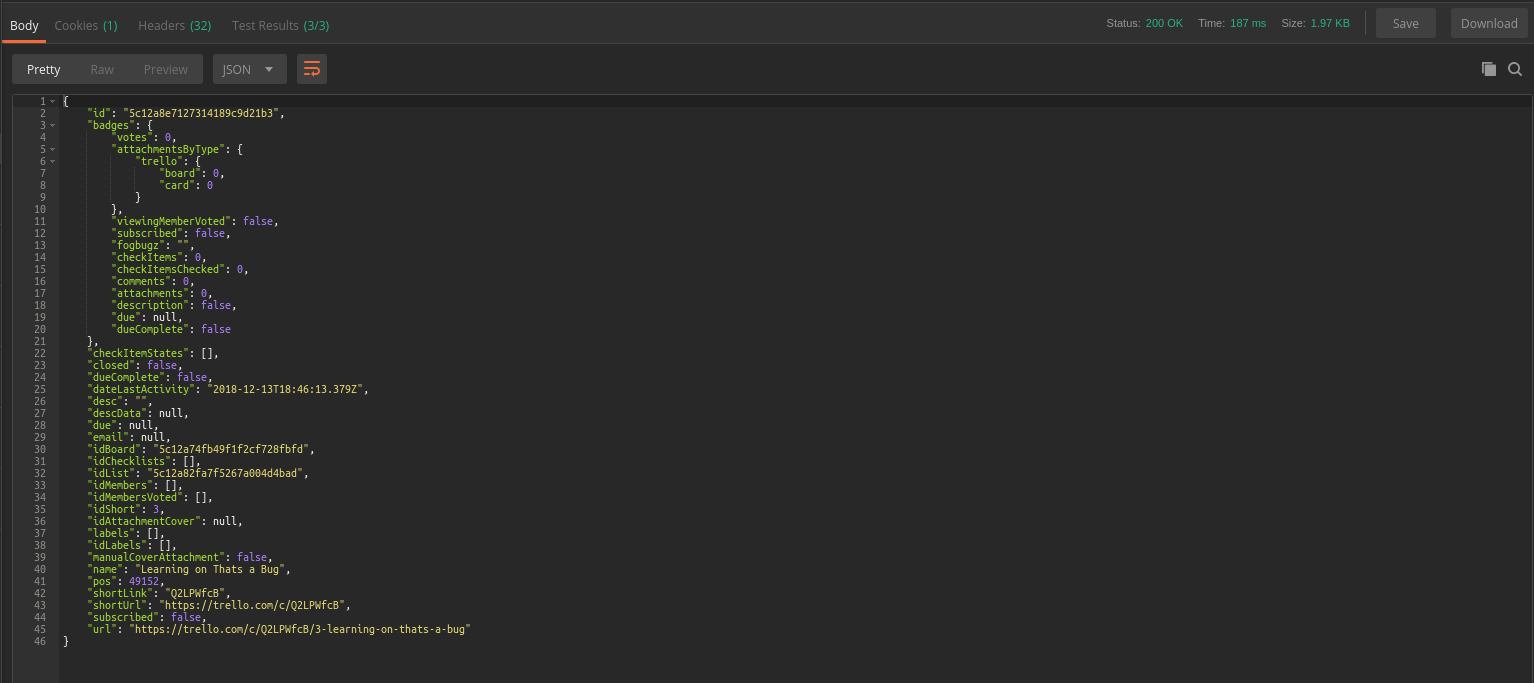
Although returning all this information seems a waste of network bandwidth, it makes sense because we never know if changing one attribute will cascade changes in others.
For instance, updating the birthday of a person changes her age - and if we would just receive a 200 OK response from our PUT request, we would need to make another request (a GET) to know the updated age.
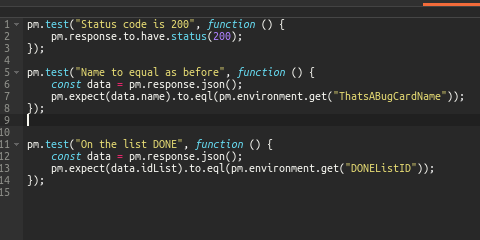
The tests are pretty straightforward now: Let’s check the response code as OK, if the card’s name was not changed, and that the card is on the DONE list, by using its ID.
Step 5.1: Invalid operations
Let’s say we send a move request for a card that does not exist - maybe it never existed, or another application have deleted between our creation and move requests.
How would Trello respond to it? It will ignore the request? Will the application crash? Will it give us a nice error message?
Let’s send the following request:
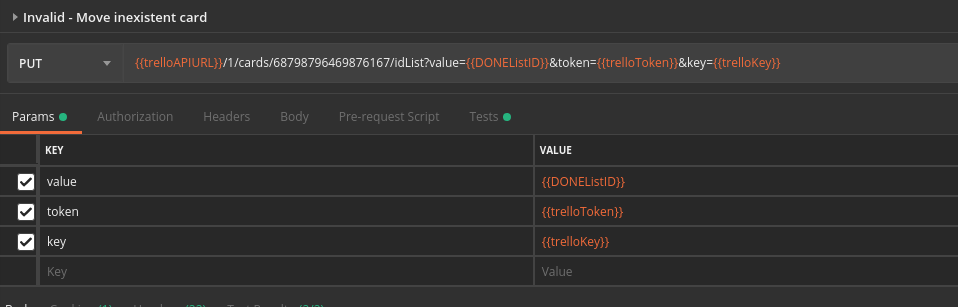
The request is similar to the previous one, however, we are referencing a completely made up card ID.
Let’s see the response for this request:

The response now is not a JSON object, but pure text, saying “invalid id”.
The response code is no longer 200 OK - but 400 Bad Request. This choice may seem is odd, because an error 400 indicates that the server could not understand the request, usually due an invalid syntax on the request. A response 404 Not Found would be more meaningful, since the card ID simply does not exist, correct?
Wrong
The request is actually bad formatted, because we have passed a random list of numerical values. The Trello API stores the card ID with cryptographic values. In order to simulate a nonexistent card, let’s just change the last value of the real card ID - the format is as in a real ID, but this values simply does not exist.
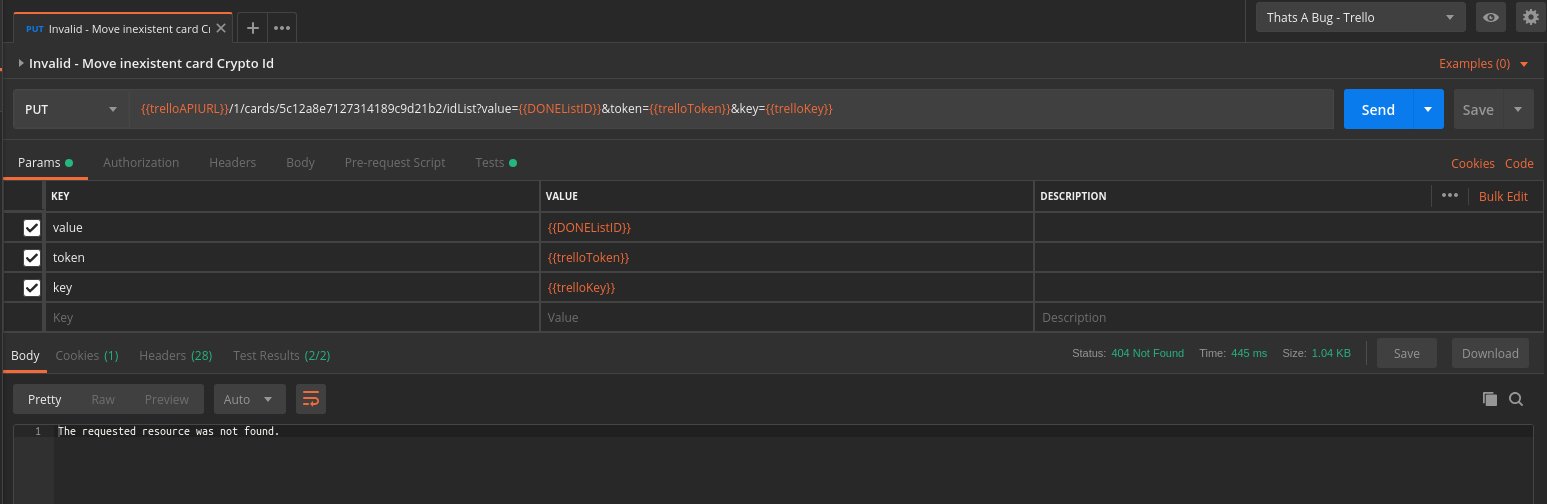
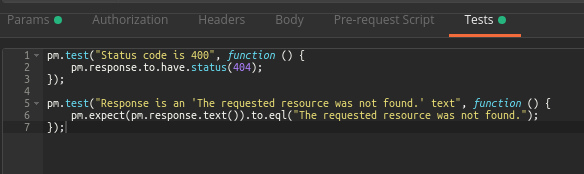
The response has code 404: Not Found. And the body of it is a simple text, but now saying that Trello searched for the resource, but couldn’t find.
We can then test these two properties.
Step 6: Deleting the board
We have already Created, Retrieved, and Updated boards, lists and cards. Now it’s time to Delete our board, so nobody will see the mess we’ve done.
The endpoint to delete boards is accessed by the following cURL command:
curl --request DELETE --url https://api.trello.com/1/boards/id
The domain is the same for Creating Boards, but the request type is different: We will be sending a DELETE, because we want to remove an entity from the database.
On Postman, the request is also similar to the board creation, but with a different type.
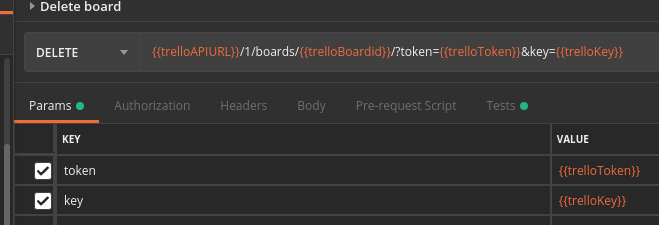
We are using the environment variable that stored the board ID at the moment of creation in the URL on the deletion call.
After sending the request, we get 200 OK as response, with a null-like body:

This response body seems like something used internally by Trello’s frontend, which can change any time. It’s better then just to test for the response type.

Another test that could be done would be to request the deleted board, using the environment variable that holds the deleted board ID and Postman sendRequest asynchronous method - but it will be topic of a future post.
How to make it even better?
The step-by-step above ignores some features that Postman has which could improve the productivity and reliability of the tests:
-
We are not using Postman Runner: It chains the many requests in a flow, executing them in the sequency we define. Besides allowing us to run all requests with one click, a fixed flow would ensure we are not running them in a sequence that would break our tests: For instance, if we hit the board creation request twice, the environment variable would hold only the second board - the first one would be idle forever. We have a post on Postman Runner, click here to check it out
-
We are keeping all variables, even when not used anymore: It can lead bugs in our Runner flows, because some variable may be used in an unexpected way.
-
We are not exploring: In the steps, we were validating only the entity we are dealing with, the board, the list, and the card. However, we were not checking the consequences of the changes in the target entities: For instance, when you create a card in a list, the card should be returned on the /lists/{id}/cards endpoint. So, we would need to fetch the cards in the list before the request, make the request itself, and check if the new set of cards is equal to the previous one plus the new card.
Conclusion
We’ve seen how Postman enable us to rapidly step interactions with an API, using simple authentication methods and test operations over entities that we created. The steps above are the core of API Testing using Postman; however, to improve the reliability of our suite, we can to use Postman features discussed above.
In the next posts, we will refactor this suite to leverage all Postman power!
You can download the suite here and run it by yourself:
Leave a comment