
Subscribe to our RSS here.
The problem with testing the UI using Selenium
Selenium is a popular which enables us to drive interactions with a browser programmatically - simulating user journeys and checking the application behavior. However, by its nature, a Selenium test depend on a manifold of components interacting with each other. Any problem with any these components will probably raise an error in Selenium test (or in many)
This is good! With one test when can cover many components.
However, it comes with three big prices:
- High run-time;
- Low precision in checking;
- High maintenance cost;
The solution would be to check a component behavior in isolation. In doing so, we lose the high coverage, but we gain the three factors mentioned above.
Service testing is already stabilized in the industry, with many tools which enable testing in progressive level of granularity, from unit (function level) testing to API testing (black-box checks on the whole service).
On the other hand, Web UI historically lacked this kind of tools, because it was based on HTML and CSS, with small portions of JavaScript (logic worth fine-grained checks). Using end-to-end checks could be sufficient to cover UI as well.
However, this is the past. More and more logic is added on UI, even on low performance devices1, as smartphones. Checking thoroughly the number of decisions and business logic on modern frontend applications is for Tony Stark (rich) and Dr. Meirschultz (mad scientist). Bring the techniques used on services testing to the frontend is necessary for the best usage of developers’ time and organization’s resources.
Most modern frontend frameworks provide their own tools for checking, this series of posts will be focused on Ember.js(version 3.3, using QUnit as test runner) - similar techniques can be found for React and Angular.
The basics of an Ember.js application
Below is a architectural representation of an Ember.js app (image from Karuna Sehgal).
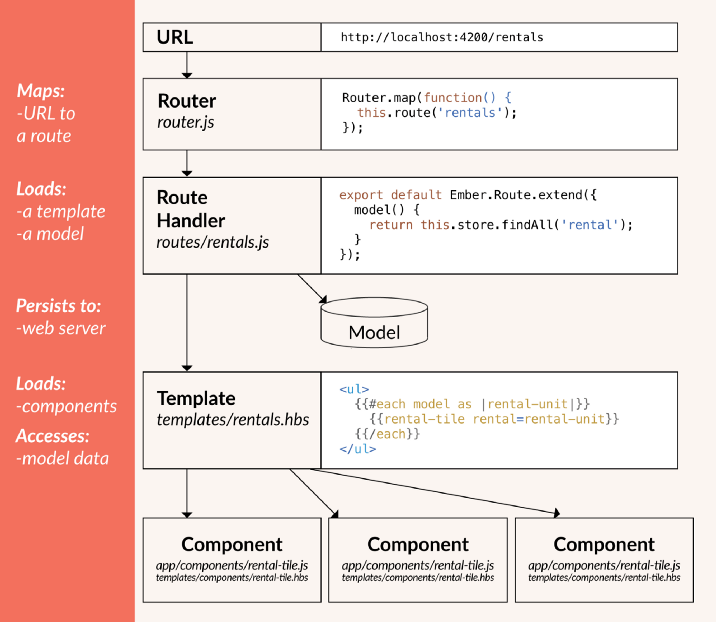
Without going into many details, an Ember.js app starts with the access in an URL, which is decomposed by the Router and the Route Handler.
This will determine which objects should be created, the model (data) and the template, which is a HTML representation, attached to components (JavaScript).
With these objects, the user is able to interact with the web app, and the components will determine the reaction to these actions.
Testing an Ember Application
In this post, we will focus primarily on the functional side of Ember testing, trying to validate if the business logic is correctly implemented in the system.
Namely, we will take a look at:
- Application Tests;
- Component Tests;
- Unit Tests.
Application Tests
Application Tests (previously called Acceptance Tests) setup and destroy the whole Ember app from scratch between tests, creating exactly every object and running every line of code as in the production app, including rendering. This enable us to simulate the user actions with confidence that no mocking is creating a false environment - and letting bugs pass through our checks.
“So, exactly the same as Selenium/end-to-end tests?” Not so.
There is one element that is not executed during Application Tests:
All networking activity can be mocked. It both eliminates the necessity of performing such time-consuming operations during the tests execution, database setup for different test scenarios, and tests failures due bugs in external service. Thus, we can focus solely on checking the behavior of the frontend code.
(I know you raise your eyebrows now - I will take about this problem you thought in a future post)
In summary, the goal of Application Tests is to validate how all components behave together, when rendered in response to page landing and actions of the user, under certain data contexts.
Below you can find two simple Application Test:
test("should say welcome at landing page", async function(assert) {
  await visit("/");
  assert.equal(
    this.element.querySelector(".welcome_message").textContent,
    "Welcome!",
    "should say 'Welcome'"
  );
});
test("filtering rental list", async function(assert) {
  await visit("/");
  await fillIn(".list-filter input", "Urban Living");

  assert.ok(
      this.element.querySelectorAll(".results .listing").length,
      1,
      "should display 1 listing"
    );
    assert.equals(
      this.element
        .querySelector(".listing .location")
        .textContent,"Urban Living"),
      "should display only the location Urban Living"
    );
});
Very similar to a Selenium test, right?
On the first test, we simply access page app root page, waiting for any Ajax call to end (auto-magic page load wait) and check if the message is the one we expect.
On the second test, we access the same page again, fill the input with a specific location and check both if the list displays only one item and that the title of this item is exactly the text we searched.
After each test, the app is totally destroyed and rebuilt - so, if we had had some state after our actions, it would be gone. It deals with most cases of flakiness and allow the holy grail of parallel execution. We can run 1.000.000 Ember tests at once in a machine, no need to touch databases. AWESOME!
If you have code duplication O.C.D., you probably is scratching yourself. Let’s deal with it.
const rentalPage = {
  visitRoot: () => visit("/"),
  findElement: locator => this.element.querySelector(locator),
  findElements: locator => this.element.querySelectorAll(locator),
  fillInput: (locator, text) => fillIn(locator, text)
};

test("should say welcome at landing page", async function(assert) {
  await rentalPage.visitRoot();
  assert.equal(
    rentalPage.findElement(".welcome_message").textContent,
    "Welcome!",
    "should say 'Welcome'"
  );
});
test("filtering rental list", async function(assert) {
  await rentalPage.visitRoot();
  await rentalPage.fillInput(".list-filter input", "Urban Living");

  assert.ok(
      rentalPage.findElements(".results .listing").length,
      1,
      "should display 1 listing"
    );
    assert.equals(
      rentalPage.findElement(".listing .location").textContent,
      "Urban Living"),
      "should display only the location Urban Living"
    );
});
We’ve created an object with cool functions which wrap the interaction with the page…
A.k.a.: Page Object :)
Of course, this is primitive. Luckily the Ember.js community created an awesome Page Object addon. I will talk about it in details, and give some tips, in the future.
Let’s say we have an app called “What’s the date?”, which asks for a service the current date and displays a message with it.
Do we need check it with end-to-end tests? Nope…
That´s when another great addon appears: Mirage.
Mirage´s goal is to intercept web requests to services and return mocked data.
It fools the Ember app, making it behave as if a real service have returned a response. Let´s see how it works:
test("displays a date in the american format", async function(assert) {
  await visit("/american-date");
  assert.equal(
    this.element.querySelector(".date").textContent,
    "12/31/2018",
    "should display the last date of 2018 in american format"
  );
});
// File: /mirage/config.js
this.get("/date", function(db, request) {
  return { day: "31", month: "12", year: "2018" };
});
The first file contains the test - similar to the others. The config.js file is the new thing.
In it, we indicate the endpoint that we want to intercept and a function to process the request. In this case, we completely ignore the request data and just returned a fixed date.
That’s what we need for your test!
We want to know if the app will behave correctly when receiving a (any!) date as a response. So, instead of being dependable of a correct implementation of the service, we are focusing on our frontend app. More complex situations can be created using just in-memory processing, avoiding touching databases or network.
Components Tests
We argued that the point of testing frontend in isolation was because of the increasing load of business logic on these applications. So, since Application Tests setup a “whole Ember app” on each test, we can expect hit the performance wall if we try to broadly cover our app using this tool. Luckily, we can go one-level down and perform checking at the component level.
This kind of testing is interested in verifying the behavior (specially rendering) of each component in isolation - mocking every dependency, both services and other components.
The test below will validate how the rental-listing component behaves.
test('should display rental details', async function(assert) {
    const ownerName = faker.name.findName();
    const city = faker.address.city();
    const rental = {
        image: 'fake.png',
        title: faker.name.findName(),
        owner: ownerName,
        owner_email: faker.internet.email(),
        price: faker.commerce.price(),
        city: city,
        bedrooms: faker.random.number({min:1, max:10});
    };
    await render(hbs`{ {rental-listing rental=rental} }`);
    assert.equal(this.element.querySelector('.listing .owner').textContent.trim(), ownerName);
    assert.equal(this.element.querySelector('.listing .city').textContent.trim(), city);
  });
Firstly, we have to prepare mock data to be injected into the component. It gives us total control to this test on the cases we want to validate - independently on the contexts that this component will be used in the app.
However, we really don’t care about the data itself, we just want to know the the exact data we are using is displayed. That’s why we can use the Faker.js library to create realistic random data for each field at each test execution. This way, we cover more space and may ended up finding some cases where we wrongly judged the domain boundaries.
Secondly, we render the rental-listing component using this data. The Ember.js engine will create the minimal environment to render this component - as if the whole app was only this list of rentals.
Lastly, we check the displayed message. We use CSS Selectors because this test really renders the component. It behaves exactly as if if was in an app.
This allow us to go deep in different scenarios without having to create other objects, optimizing the suite performance.
Let´s test if the name displayer can deal with people who doesn´t have a last name.
test('displays full name with first and last name', async function(assert) {
    this.set('firstName', 'Mary');
    this.set('lastName', 'Johnson');

    await render(hbs`
      { {fullNameDisplayer} }
    `);
    assert.equal(this.element.querySelector('.full_name').textContent, 'Johnson, Mary');
}
test('displays full name with only first name', async function(assert) {
    this.set('firstName', 'Mary');
    this.set('lastName', null);

    await render(hbs`
      { {fullNameDisplayer} }
    `);
    assert.equal(this.element.querySelector('.full_name').textContent, 'Mary');
}
Unit Tests
Well… We always can try to go deeper, right?
Let’s look how the fullNameDisplayer component calculates the full name based on its two attributes:
fullName: computed('fullName', function() {
    const firstName = this.get('firstName');
    const lastName = this.get('lastName');
    if(lastName) {
        return `${lastName}, ${firstName}`;
    } else {
        return firstName;
    }
}
On the component test above, we forcibly set the attributes we wanted, rendered the component and check if the calculated value was correct.
However, the two cases of name calculation themselves have nothing with rendering.
We have to test this function - the returned values in various situations - and test the rendering for only one situation.
That’s when Unit Tests enter in scene. Ember.js’ Unit Tests have no rendering - they are composed purely of in-memory operations (as fast as it gets).
Let’s take a look in some examples:
test("should display last name and first name in order", function(assert) {
  // get the controller instance
  const controller = this.owner.lookup("controller:names");

  controller.set("firstName", "Michael");
  controller.set("lastName", "Jordan");

  assert.equal(someThing.get("fullName"), "Jordan, Michael");
});
test("should display only the first name if no last name exist", function(assert) {
  // get the controller instance
  const controller = this.owner.lookup("controller:names");

  controller.set("firstName", "Michael");
  controller.set("lastName", null);

  assert.equal(someThing.get("fullName"), "Michael");
});
Pretty straightforward, right?
We first get the object which performs the operations (the Controller).
Then, we set the parameters that the function takes (the pure attributes), call the function, and check its return.
Easy-peasy…
The second test teaches us a lesson: When possible try to go to lower levels of checking.
Previously, we were checking the nullable lastName case on the Component Test level, however, after looking deep into the function which create the full names, we realized that we don’t need rendering, only the logic. Thus, we can write an Unit Test and delete the Component Test.
Improving performance without loosing coverage: AWESOME!
End-to-End is NOT dead
WAIT! Don’t delete your Selenium suite.
End-to-end tests still have its purposes and are able to perform checks that frontend or service checks in isolation would not catch.
Let’s say you have balance loader in your system, which directs requests from a master server to various slave machines based on the user location, creating slightly different results according to that.
How would you validate that computing resources are correctly distributed according to the balance loader configuration, giving a good throughput to most users?
Other complex relations, specially in legacy systems, are difficult to mock - or the mocking gives little confidence in the asserting.
Either way, in any system there is space checks in levels below the end-to-end. And in order to be able to grow a broad and brisk suite of automated checks, we need to pay attention to opportunities of using the least expensive tool for each situation.
Try to use a silver bullet and you will find trouble.
From here…
We’ve just touched the basics of testing Ember.js apps. Other very interesting topics are:
- Routes and Models testing;
- The addons created by the Ember community: Mirage, Accessibility, Page Object, Ember Exam, Percy;
- Configuration necessary to instruct the app on how to glue all this pieces together.
Footnotes
1 - Yes, I know your smartphone is more powerful than most computers.
Leave a comment